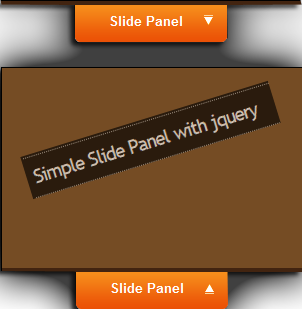
1. Log in to your blogger account
2 .Go to Design --> Edit HTML
3. Copy the code below, and paste above ]]></b:skin>
#container {
clear: both;
margin: 0;
padding: 0;
}
#container a{
float: right;
background: #9FC54E;
border: 1px solid #9FC54E;
-moz-border-radius-topright: 20px;
-webkit-border-top-right-radius: 20px;
-moz-border-radius-bottomleft: 20px;
-webkit-border-bottom-left-radius: 20px;
text-decoration: none;
font-size: 16px;
letter-spacing:-1px;
font-family: verdana, helvetica, arial, sans-serif;
color:#fff;
padding: 20px;
font-weight: 700;
}
#container a:hover{
float: right;
background: #a0a0a0;
border: 1px solid #cccccc;
-moz-border-radius-topright: 20px;
-webkit-border-top-right-radius: 20px;
-moz-border-radius-bottomleft: 20px;
-webkit-border-bottom-left-radius: 20px;
text-decoration: none;
font-size: 16px;
letter-spacing:-1px;
font-family: verdana, helvetica, arial, sans-serif;
color:#fff;
padding: 20px;
font-weight: 700;
}
.content {
font-style:normal;
font-family:helvetica, arial, verdana, sans-serif;
color:#ffffff;
background:#333333;
border:1px solid #444444;
-moz-border-radius-topright: 20px;
-webkit-border-top-right-radius: 20px;
-moz-border-radius-bottomleft: 20px;
-webkit-border-bottom-left-radius: 20px;
margin: 30px 0 50px;
padding: 15px 0;
}
.content p {
margin: 10px 0;
padding: 15px 20px;
}
.panel {
position: absolute;
top: 250px;
left: 0;
display: none;
background: #000000;
border:1px solid #111111;
-moz-border-radius-topright: 20px;
-webkit-border-top-right-radius: 20px;
-moz-border-radius-bottomright: 20px;
-webkit-border-bottom-right-radius: 20px;
width: 330px;
height: auto;
padding: 30px 30px 30px 130px;
filter: alpha(opacity=85);
opacity: .85;
}
.panel p{
margin: 0 0 15px 0;
padding: 0;
color: #cccccc;
}
.panel a, .panel a:visited{
margin: 0;
padding: 0;
color: #9FC54E;
text-decoration: none;
border-bottom: 1px solid #9FC54E;
}
.panel a:hover, .panel a:visited:hover{
margin: 0;
padding: 0;
color: #ffffff;
text-decoration: none;
border-bottom: 1px solid #ffffff;
}
a.trigger{
position: absolute;
text-decoration: none;
top: 250px; left: 0;
font-size: 16px;
letter-spacing:-1px;
font-family: verdana, helvetica, arial, sans-serif;
color:#fff;
padding: 20px 40px 20px 15px;
font-weight: 700;
background:#333333 url(https://blogger.googleusercontent.com/img/b/R29vZ2xl/AVvXsEh53fx_k6YoFpZW2ULwYBe6w0wo6ux7zVXXzPWCvpr6B4ziEzf9mhIkC50sAT1BszKyzN8M1zVbMgLEtcuLcNYUVbUQ7tiJBsAP8-PWfA6vulL1cakXpcyo57_rXce2efRpuiG1Sn1Vg50/s320/plus.png) 85% 55% no-repeat;
border:1px solid #444444;
-moz-border-radius-topright: 20px;
-webkit-border-top-right-radius: 20px;
-moz-border-radius-bottomright: 20px;
-webkit-border-bottom-right-radius: 20px;
-moz-border-radius-bottomleft: 0px;
-webkit-border-bottom-left-radius: 0px;
display: block;
}
a.trigger:hover{
position: absolute;
text-decoration: none;
top: 250px; left: 0;
font-size: 16px;
letter-spacing:-1px;
font-family: verdana, helvetica, arial, sans-serif;
color:#fff;
padding: 20px 40px 20px 20px;
font-weight: 700;
background:#222222 url(https://blogger.googleusercontent.com/img/b/R29vZ2xl/AVvXsEh53fx_k6YoFpZW2ULwYBe6w0wo6ux7zVXXzPWCvpr6B4ziEzf9mhIkC50sAT1BszKyzN8M1zVbMgLEtcuLcNYUVbUQ7tiJBsAP8-PWfA6vulL1cakXpcyo57_rXce2efRpuiG1Sn1Vg50/s320/plus.png) 85% 55% no-repeat;
border:1px solid #444444;
-moz-border-radius-topright: 20px;
-webkit-border-top-right-radius: 20px;
-moz-border-radius-bottomright: 20px;
-webkit-border-bottom-right-radius: 20px;
-moz-border-radius-bottomleft: 0px;
-webkit-border-bottom-left-radius: 0px;
display: block;
}
a.active.trigger {
background:#222222 url(https://blogger.googleusercontent.com/img/b/R29vZ2xl/AVvXsEgmtboUqF7tArAhRJJQUSIO5CMxu0CtLashUcm_Z84NX0a1sjg1_EyN2z1SSRIIrFQNLAB1oMtmbqgLxp2A4gDL3JZ03aM_L0hSqTETO6vAKlr9Ae9wl875hIoWws4XaG3Y2b3_923Gn5Y/s320/minus.png) 85% 55% no-repeat;
}
.columns{
clear: both;
width: 330px;
padding: 0 0 20px 0;
line-height: 22px;
}
.colleft{
float: left;
width: 130px;
line-height: 22px;
}
.colright{
float: right;
width: 130px;
line-height: 22px;
}
ul{
padding: 0;
margin: 0;
list-style-type: none;
}
ul li{
padding: 0;
margin: 0;
list-style-type: none;
}
clear: both;
margin: 0;
padding: 0;
}
#container a{
float: right;
background: #9FC54E;
border: 1px solid #9FC54E;
-moz-border-radius-topright: 20px;
-webkit-border-top-right-radius: 20px;
-moz-border-radius-bottomleft: 20px;
-webkit-border-bottom-left-radius: 20px;
text-decoration: none;
font-size: 16px;
letter-spacing:-1px;
font-family: verdana, helvetica, arial, sans-serif;
color:#fff;
padding: 20px;
font-weight: 700;
}
#container a:hover{
float: right;
background: #a0a0a0;
border: 1px solid #cccccc;
-moz-border-radius-topright: 20px;
-webkit-border-top-right-radius: 20px;
-moz-border-radius-bottomleft: 20px;
-webkit-border-bottom-left-radius: 20px;
text-decoration: none;
font-size: 16px;
letter-spacing:-1px;
font-family: verdana, helvetica, arial, sans-serif;
color:#fff;
padding: 20px;
font-weight: 700;
}
.content {
font-style:normal;
font-family:helvetica, arial, verdana, sans-serif;
color:#ffffff;
background:#333333;
border:1px solid #444444;
-moz-border-radius-topright: 20px;
-webkit-border-top-right-radius: 20px;
-moz-border-radius-bottomleft: 20px;
-webkit-border-bottom-left-radius: 20px;
margin: 30px 0 50px;
padding: 15px 0;
}
.content p {
margin: 10px 0;
padding: 15px 20px;
}
.panel {
position: absolute;
top: 250px;
left: 0;
display: none;
background: #000000;
border:1px solid #111111;
-moz-border-radius-topright: 20px;
-webkit-border-top-right-radius: 20px;
-moz-border-radius-bottomright: 20px;
-webkit-border-bottom-right-radius: 20px;
width: 330px;
height: auto;
padding: 30px 30px 30px 130px;
filter: alpha(opacity=85);
opacity: .85;
}
.panel p{
margin: 0 0 15px 0;
padding: 0;
color: #cccccc;
}
.panel a, .panel a:visited{
margin: 0;
padding: 0;
color: #9FC54E;
text-decoration: none;
border-bottom: 1px solid #9FC54E;
}
.panel a:hover, .panel a:visited:hover{
margin: 0;
padding: 0;
color: #ffffff;
text-decoration: none;
border-bottom: 1px solid #ffffff;
}
a.trigger{
position: absolute;
text-decoration: none;
top: 250px; left: 0;
font-size: 16px;
letter-spacing:-1px;
font-family: verdana, helvetica, arial, sans-serif;
color:#fff;
padding: 20px 40px 20px 15px;
font-weight: 700;
background:#333333 url(https://blogger.googleusercontent.com/img/b/R29vZ2xl/AVvXsEh53fx_k6YoFpZW2ULwYBe6w0wo6ux7zVXXzPWCvpr6B4ziEzf9mhIkC50sAT1BszKyzN8M1zVbMgLEtcuLcNYUVbUQ7tiJBsAP8-PWfA6vulL1cakXpcyo57_rXce2efRpuiG1Sn1Vg50/s320/plus.png) 85% 55% no-repeat;
border:1px solid #444444;
-moz-border-radius-topright: 20px;
-webkit-border-top-right-radius: 20px;
-moz-border-radius-bottomright: 20px;
-webkit-border-bottom-right-radius: 20px;
-moz-border-radius-bottomleft: 0px;
-webkit-border-bottom-left-radius: 0px;
display: block;
}
a.trigger:hover{
position: absolute;
text-decoration: none;
top: 250px; left: 0;
font-size: 16px;
letter-spacing:-1px;
font-family: verdana, helvetica, arial, sans-serif;
color:#fff;
padding: 20px 40px 20px 20px;
font-weight: 700;
background:#222222 url(https://blogger.googleusercontent.com/img/b/R29vZ2xl/AVvXsEh53fx_k6YoFpZW2ULwYBe6w0wo6ux7zVXXzPWCvpr6B4ziEzf9mhIkC50sAT1BszKyzN8M1zVbMgLEtcuLcNYUVbUQ7tiJBsAP8-PWfA6vulL1cakXpcyo57_rXce2efRpuiG1Sn1Vg50/s320/plus.png) 85% 55% no-repeat;
border:1px solid #444444;
-moz-border-radius-topright: 20px;
-webkit-border-top-right-radius: 20px;
-moz-border-radius-bottomright: 20px;
-webkit-border-bottom-right-radius: 20px;
-moz-border-radius-bottomleft: 0px;
-webkit-border-bottom-left-radius: 0px;
display: block;
}
a.active.trigger {
background:#222222 url(https://blogger.googleusercontent.com/img/b/R29vZ2xl/AVvXsEgmtboUqF7tArAhRJJQUSIO5CMxu0CtLashUcm_Z84NX0a1sjg1_EyN2z1SSRIIrFQNLAB1oMtmbqgLxp2A4gDL3JZ03aM_L0hSqTETO6vAKlr9Ae9wl875hIoWws4XaG3Y2b3_923Gn5Y/s320/minus.png) 85% 55% no-repeat;
}
.columns{
clear: both;
width: 330px;
padding: 0 0 20px 0;
line-height: 22px;
}
.colleft{
float: left;
width: 130px;
line-height: 22px;
}
.colright{
float: right;
width: 130px;
line-height: 22px;
}
ul{
padding: 0;
margin: 0;
list-style-type: none;
}
ul li{
padding: 0;
margin: 0;
list-style-type: none;
}
4. Then copy the code below, and paste above </head>
<script src='http://pelajarandashblogdotblogspotdotcom.googlecode.com/files/jquery-1.3.2.js' type='text/javascript'/>
<script type='text/javascript'>
$(document).ready(function(){
$(".trigger").click(function(){
$(".panel").toggle("fast");
$(this).toggleClass("active");
return false;
});
});
</script>
5. Then, click SAVE TEMPLATE<script type='text/javascript'>
$(document).ready(function(){
$(".trigger").click(function(){
$(".panel").toggle("fast");
$(this).toggleClass("active");
return false;
});
});
</script>
6. Now, go to Page Elements --> Add Gadget, choose "HTML/Java Script"
7. Then, add the code below
<div class="panel">
<h2>Choose the categories:</h2>
<div style="clear:both;"></div>
<div class="columns">
<div class="colleft">
<h3>Full Blog Tricks-1</h3>
<ul>
<li><a href="#" title=" FBT1">FBT1</a></li>
<li><a href="#" title=" FBT2">FBT2</a></li>
<li><a href="#" title=" FBT3">FBT3</a></li>
<li><a href="#" title=" FBT4">FBT4</a></li>
<li><a href="#" title=" FBT5">FBT5</a></li>
</ul>
</div>
<div class="colright">
<h3>Full Blog Tricks-2</h3>
<ul>
<li><a href="#" title=" FBT1">FBT1</a></li>
<li><a href="#" title=" FBT2">FBT2</a></li>
<li><a href="#" title=" FBT3">FBT3</a></li>
<li><a href="#" title=" FBT4">FBT4</a></li>
<li><a href="#" title=" FBT5">FBT5</a></li>
</ul>
</div>
</div>
<div style="clear:both;"></div>
</div>
<a class="trigger" href="#">Find More!</a>
=> Customize first the links
8. Click SAVE

